FLutter build with Flavor (part-2) - API config

Sang phần này mình sẽ cấu hình với url API cho từng môi trường. Cái này sẽ rất thường gặp vì mỗi một môi trường sẽ có 1 backend đi kèm. Để tiện nhất thì cấu hình luôn cho dễ xử lý sau này.
Đầu tiên thêm 2 pub sau:
package_info_plus -> cái này để tiện cho việc get flavor
dio -> call API hoy (cái này ko bắt buộc hé)
Đầu tiên tạo file config để có thể lấy ra được flavor và từ đó chỉ định API cho chính xác theo flavor đó.
Tạo 1 file app_config.dart đã nhé. Trong đây mình sẽ tạo các thông số cần thiết cho việc gọi đến API của backend cùng cấp. Tại đay mình chỉ hướng dẫn cơ bản là thay đổi API thôi. còn lại thì mọi người tự mở rộng theo dự án của mình nhé
import 'package:package_info_plus/package_info_plus.dart';
enum EnvironmentType {
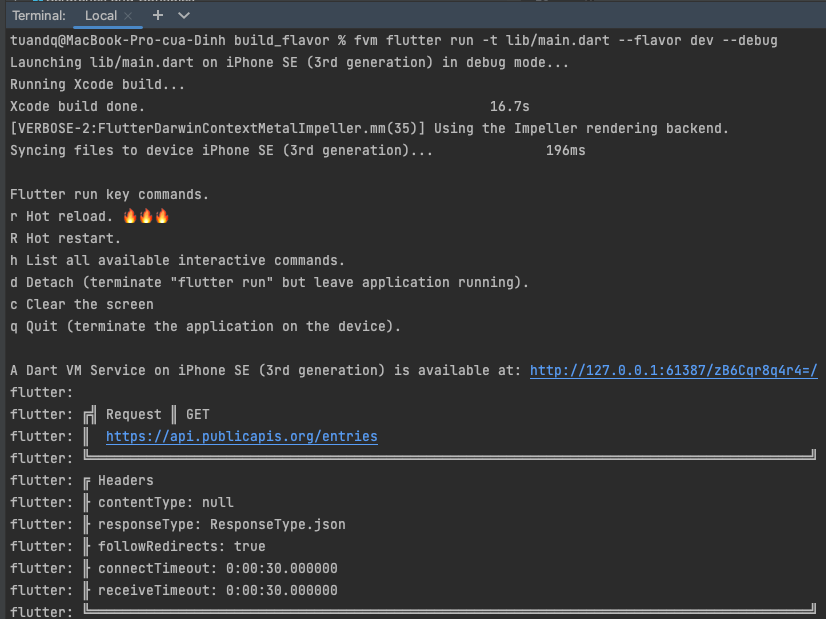
dev(apiBaseUrl: 'https://api.publicapis.org/entries'),
stg(apiBaseUrl: 'https://api.sampleapis.com/coffee/hot'),
prod(apiBaseUrl: 'https://api.sampleapis.com/coffee/hot');
const EnvironmentType({required this.apiBaseUrl});
final String apiBaseUrl;
}
class AppConfig {
static EnvironmentType? _current;
static EnvironmentType get buildType => _current!;
static Future<EnvironmentType> current() async {
if (_current != null) {
return _current!;
}
final packageInfo = await PackageInfo.fromPlatform();
switch (packageInfo.packageName) {
case "vn.pirago.dev":
_current = EnvironmentType.dev;
break;
case "vn.pirago.stg":
_current = EnvironmentType.stg;
break;
default:
_current = EnvironmentType.prod;
}
return _current!;
}
}
Giải thích qua 1 chút về các thông số đã nhể.
'enum EnvironmentType' -> cái này để định nghĩa các thông số theo môi trường
'AppConfig' -> class này sẽ dựa vào build để có thể lấy ra enum theo môi trường.
Khởi tạo AppConfig tại main() để lấy thông số trước khi vào ứng dụng
void main() async {
  WidgetsFlutterBinding.ensureInitialized();
  await AppConfig.current(); // -> Khởi tạo AppConfig
  runApp(const MyApp());
}
Đối với phần call api tạm code như sau
class _MyHomePageState extends State<MyHomePage> {

  @override
  void initState() {
    super.initState();
    var dio = Dio(
      BaseOptions(
        baseUrl: AppConfig.buildType.apiBaseUrl, //-> Cái này là lấy ra từ AppConfig theo môi trường nè
        connectTimeout: const Duration(seconds: 30),
        receiveTimeout: const Duration(seconds: 30),
      ),
    )..interceptors.add(PrettyDioLogger(
        requestHeader: true,
        requestBody: true,
        responseBody: true,
        responseHeader: false,
        error: true,
        compact: true,
        maxWidth: 90));

    dio.get('');
  }

  @override
  Widget build(BuildContext context) {
    return Scaffold(
      appBar: AppBar(
        backgroundColor: Theme.of(context).colorScheme.inversePrimary,
        title: Text(widget.title),
      ),
      body: Center(
        child: Container(),
      ),
    );
  }
}
Rồi đấy! Giờ chạy thử thôi nhỉ. Cứ run lần lượt thôi. Run dev trước cái nhể, :D
giờ run thử stg cái nhể

Chuẩn bài rồi. húp thôi. Đợi ver cuối để đến với phần phức tạo nhất nhé. Cấu hình với GG.